Wednesday, March 24, 2010

Potato and Leek Soup, Bacon Wrapped Shrimp, & Garlic Bread

You know when winter is transitioning to spring when all you want is to curl up with a warm, creamy soup. With Angela's recent corn chowder post I thought I'd follow up with one of my favorite soups: Potato & Leek.

Recipe here, followed to the T: http://pinchmysalt.com/2008/03/19/a-hearty-potato-leek-soup-recipe-for-the-last-days-of-winter/

The only part that wasn't explained well was cutting the leek. How? You cut off 1/4 inch from the bottom stub, and cut off all the dark green part (about 1/2 inch into the light green part of the leek). You only use the white & light green parts, since that's the tender part of it. Chop lengthwise and then chop it up into finer portions. Wash thoroughly using a colander.


I made one change, and that was to add in some white truffle oil that I've been wanting to use. It makes the soup taste different--even more delicious!


What pairs well with a hearty soup? Hearty food!! So I decided to complete the dinner with some simple Bacon Wrapped Shrimp & Garlic Bread:

Bacon Wrapped Shrimp: wrap uncooked bacon around peeled, raw shrimp and secure with a toothpick.


Grill on BBQ in medium to medium-high heat for 5-6 minutes. When the bacon is done, the shrimp will be done. (In the below picture the bacon is done but perhaps slightly undercooked for my taste.)


Garlic Bread:
Find the freshest french sweet bread you can find.
Make garlic butter sauce--mix 4 tbsp butter, melted + desirable amount of garlic spread + salt if butter is unsalted + dried oregano or basil

If you want crispier garlic bread:
1. Cut baguette in half horizontally.


2. Spread garlic butter sauce as desired, and add freshly grated parmesan cheese if desired
3. Bake at 350 for 10 minutes or until desired crispiness is reached (this really depends on the size of your bread)


If you want softer garlic bread:
1. Make several vertical cuts, short lengthwise, but leaving the bread still intact at the ends.


2. Spread garlic butter sauce as desired, and add freshly grated parmesan cheese if desired
3. Wrap completely in aluminum foil


4. Bake at 350 for 15 minutes or until desired doneness is reached


Serve together and it makes for a surprisingly filling and delicious meal.

Tuesday, March 23, 2010

That Simple But Amazing Tomato Sauce Everyone Raves About

Not really knowing how to name this post, we'll just jump straight into the goodies. Listen up folks: this is seriously one of the simplest, easiest recipes ever. Grabbed the recipe from here: http://smittenkitchen.com/2010/01/tomato-sauce-with-butter-and-onions/

It's literally 3 ingredients. 3! Tomatoes, butter, and onion. Measurements:
1. Two 28 ounces canned, whole peeled tomatoes (I used 2 cans by accident, but the recipe was still awesome ...and healthier)
2. 5 tbsp butter
3. yellow onion, peeled and halved
4? (and salt for #4, if you need it)

And the steps are as easy as 1-2-3:
1. Put all ingredients in the pot to boil
2. Turn down to simmer for 45 mins, meanwhile cooking your choice of pasta
3. Throw out onion & serve with pasta


Even though this was claimed to be the best tomato sauce ever, I just had to add ground beef. I love meat too much!

But I did get a chance to try it without the meat, and surprisingly, I could honestly eat the pasta just with the sauce. It's soooooo delicious!

Can't fathom to throw away the onions? I couldn't either. The Asian-ness in me slapped me around awhile until I succumbed to the calling for no food waste. I ended up chopping the tasty onions up and making an egg scramble/omelet out of it with some chopped ham. :)

Two great meals in one low budget. Enjoy!

Corn Chowder


This recipe is from The Best of America's Test Kitchen. This is one of the few recipes I will pay for- they're always fool proof and always delicious- they undergo extensive testing. I love the science behind the recipes (also why I love Alton Brown).


I didn't have any fresh corn- I used a bag of frozen super-sweet corn from Trader Joe's and it was good, but fresh corn is probably better and it's be creamier. I used 1/2 cup of heavy cream, but it didn't sacrifice much flavor. I missed the crisp of the bacon so I'd probably save the bacon to top the soup off with instead of mixing it into the soup. This was also the first or second time I've used a blender to create a creamy texture and I think I prefer this to adding in extra cream.


I've typed up the recipe below:

Corn Chowder
serves 6 to 8
Note: Be sure to reserve the cobs for the chowder. They add an extra layer of corn flavor.

6 ears of corn (see note)
2 (15 ounce) cans whole kernel corn, drianed
5 cups low-sodium chicken broth
3 slices bacon, chopped fine
1 onion, chopped medium (1 cup)
Salt and pepper
1 pound red potatoes (about 3), scrubbed and cut into 1/2-inch cubes
1 cup heavy cream
4 scallions, sliced thin


1. Cut the kernels from the eras of corn (see photo at right. whooops... just use your imagination); reserve the kernels and cobs separately. Puree the canned corn and 2 cups of the broth in a blender until smooth.
2. Cook the bacon in a Dutch oven over medium heat until crisp, about 8 minutes. Using a slotted spoon, transfer the bacon to a paper towel-lined plate and reserve. Cook the onion, corn kernels, 1/2 teaspoon salt, and 1/4 teaspoon pepper in the bacon fat until the vegetables soften and turn gold brown, 8 to 10 minutes.
3. Add the potatoes, corn puree, remaining 3 cups broth, and reserved corncobs to the Dutch oven and bring to a boil. Reduce the heat to medium-low and simmer until the potatoes are tender, about 15 minutes. Discard the cobs and stir in the cream, scallions, and reserved bacon. Season with salt and pepper to taste and serve. (The soup can be refrigerated in an airtight container for up to 3 days).

(the photo reference is about how to cut the corn off a cob. The caption says "Cut the cob in half crosswise, then stand it on its flat, cut end. Using a chef's knife, cut the kernels off the ear, one side at time."

Wednesday, March 17, 2010

Citrus Salad


I ate at Chez Panisse Cafe in February, using my sister's birthday as an excuse to eat here :) I called to make reservations exactly 2 months before, although they also take them through Open Table. It is not cheap, but it was worth it. The food was delicious and the staff was attentive. The prices... well it's not an everyday place (for me at least).

the Chez Panisse Cafe salad

I ordered their citrus salad with crab toasts. I've never been a big fan of citrus in salad, but this seemed so right. The crab on little toasts didn't hurt either. The combination of creamy avocado and sweet citrus stayed with me after the dinner, so I set out to make a version at home. I added arugula for some spiciness and heft so it could be a meal.

I used organic baby arugula, blood oranges, oranges, grapefruits, avocado, extra virgin olive oil and sea salt. That's it. Just supreme the fruit or slice horizontally (this is how chez panisse did it, but it was easier to for me to eat the supremes). I liked how the pieces of avocado weren't sliced into neat shapes, but in sort of organic shapes, like they just happened to fall off the pit onto my plate so I tried to do the same with a spoon.

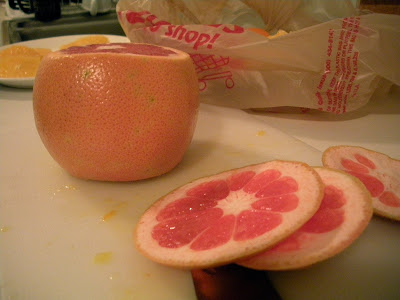
How to supreme:
(btw I can't stop cutting fruit like this! I usually peel grapefruits section by section, but this is so much faster)

Slice off the top and bottom. (I use a ralphs bag for trash so the juice doesn't drip everywhere)

The slice vertically, going with the curve of the fruit. You can do small sections at once as long as you get the white pith off.


The third part I don't have a picture of because my hands were dripping with fruit juice at this point, but you will have a big naked ball of grapefruit. Hold the fruit in one hand and the knife in the other and cut each section out, leaving the bits of skin behind. That probably didn't help, so watch this video instead. Don't worry about wasting fruit, you'll be squeezing what's left into the salad.

Here I just sliced the fruit horizontally, instead of with the sections.

I used about a handful of arugula to half an orange, half a grapefruit, a whole blood orange (mine were small), half an avocado, all the fruit juice I could squeeze out, a pinch of salt and a heavy dosing of extra virgin olive oil.

Monday, March 1, 2010

Fresh pasta dough for cheese and mushroom ravioli

Pasta dough work station.

I found a pasta maker at TJ Maxx for $16 and I had to buy it. It rolls out dough to 6 different thicknesses and does 2 different cuts (fettuccine and angel hair). I've always wanted to make fresh pasta because it's one of my favorite foods. I used this recipe for the cheese ravioli. Although by the end of it, I had no energy to make the fresh tomato sauce so I used Trader Joe's basil marinara.

The dough, resting.

Some of the comments mentioned that it was bland so I added some white mushrooms and a lot of fresh herbs (thyme, rosemary, chives) and extra garlic. I didn't think that this would make so many ravioli, but it did. AND I had leftover dough so I made pasta. This made several meals.

Trying to place small amounts of filling on the pasta. I should've put half of what I thought would fit (based on the width of the pasta that I rolled out).


Covering the filling.


Sliced (with a pizza cutter) with the air pinched out.

I was going to shape them nicely into squares, but then realized I put way too much filling in so I kept the large ravioli as is. (Note the enormous ravioli at the bottom of the photo.)

My large, irregularly shaped pasta.

I used leftover dough to make pasta when I ran out of the ravioli filling.

Oof, these were hard to pull apart the next day- definitely go heavy with the olive oil if you are making enough for leftovers. The taste is completely different from boxed pasta. It's really silky (and I used all purpose flour! It's probably even better with european 00 flour, it's ultra ultra fine) and very egg-y. So eggy that it was almost like egg pasta. This is not an everyday recipe. It took awhile to roll out each sheet and fill them, pinch all the air out and then slice them, but for a special occasion or for an empty day, very much worth the effort.

Also, you can definitely make these without a pasta roller, but I hope you have strong arms and a whole lotta time to roll out the dough.